Schema Definitions from an ODBC Text Source

Recently, I’ve worked on disjointed migration project where things just didn’t work the way you expect.  For example, you usually like to access data direct from its source (direct from a relational database) but in this situation, this was just not allowed and we were given a load of text files (hundreds) to load.  Perhaps not so bad, you may say however, unfortunately, the documentation around those files was incomplete and incorrect.  It seems that we spent for too much time confirming valid formats and playing too and fro with vendors – Its not really value adding and lets face it, its not really a good use of time to transfer and manually configure text import.  So what could we do?  All files were deposited in a directory, so why not use the Schema collections from an ODBC source?

The idea is to setup an ODBC source that points to the directory with files in it, create a connection to that source and then use the meta data of that connection to iterate over each table in the source and get the column information from that table.  Note that for a text driver, each file represents a table and that’s why I refer to tables above.

1. Setting Up the Driver

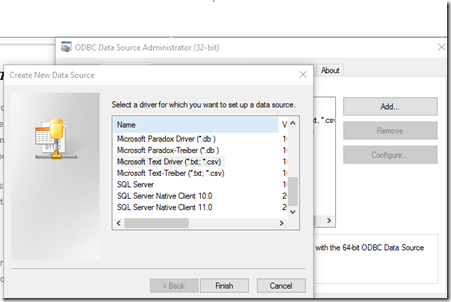
I think this is relatively straight forward so I’ll just add the key points with a word of warning.  There is no x64 bit driver installed by default for windows, so you may want to download the Access one from here if you need to.  Access the ODBC drivers from your settings (just type ODBC in the search bar and then choose to setup a connection or access ODBC sources), then just add a new source and choose the text driver.

image

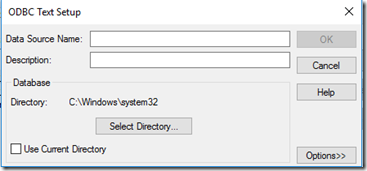
When you click Finish you’ll be presented with the window below where you can specify the directory you want to use and give the source a name (see below).  There’s no need to look at options, but if you want to, you can specify specific extensions but for now lets assume that everything in the folder is for import.

image

2. Data Access

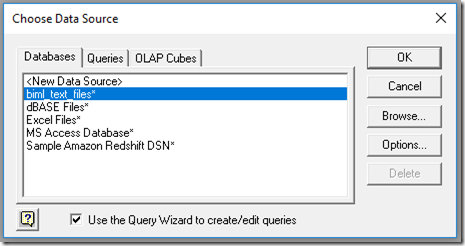
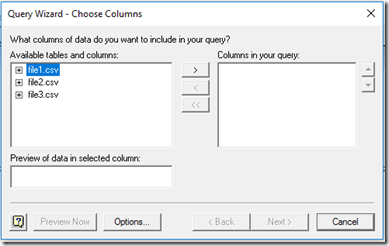
As a side note, after you’ve set up the driver, you can now import the data as a table into Excel.  The menu path is (Data Tab) Get External Data > From Other Sources > Microsoft Query.  I know you could import the file directly (ie Get External Data > From Text) however, you want to use the text driver and text your ODBC source.  You’ll notice that this source is available as a database (see below), and each file in the directory is presented as a table.  The source that I previously created is shown below and you can see the following list of tables.

image image

3. Using the ODBC Shema Object

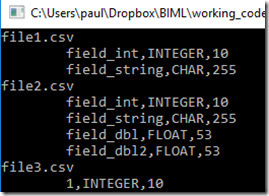
As a general rule, when we create a database connection in code, the connection object is accompanied by a schema and we can use this to interrogate  the source.  As you can see from the snippet, all we do is acquire the “tables” schema (ie list the tables), then iterate over each table to get the columns in that table.  The sample output this shown below and, as you can see, it defines the column names and types.

            OdbcConnection _con = new OdbcConnection("DSN=biml_text_files");
_con.Open();

DataTable _schema = _con.GetSchema();
DataTable _restrictions = _con.GetSchema("Restrictions");
DataTable _tables = _con.GetSchema("Tables");

foreach (DataRow _tablerow in _tables.Rows)
{
Console.WriteLine("{0}", _tablerow["TABLE_NAME"]);

string[] _table_restrictions = { null, null, _tablerow["TABLE_NAME"].ToString() };
DataTable _columns = _con.GetSchema("Columns", _table_restrictions);
foreach (DataRow _colrow in _columns.Rows)
{
Console.WriteLine("\t{0},{1},{2}", _colrow["COLUMN_NAME"], _colrow["TYPE_NAME"], _colrow["COLUMN_SIZE"]);

}

}


_con.Close();

image

Actually, you don’t even need to go to this trouble.  You could just get the columns schema without the restrictions which will give you a complete list of all columns for every table.  However, in our implementation, the data was sent back to a database so others could use it.

Conclusion

Working with the Schema Information objects allows us derive information about the source.  Its conceptually similar to the INFORMATION_SCHEMA tables in most databases however, when we apply this to text files, we can use that meta-data to build our ETL.

Getting Started with Biml Video

I am a huge fan of Biml and think that the ability to conceptually model data movement produces huge benefits when compared to the more traditional methods.

It must also strike a chord with others because my first post on biml has been made into a video by the folks at webucator.  You can check it out below or try the YouTube link.

BIML Annotations

BIML offers a great method to classify and manage code through annotations.  Basically, an annotation is just a tag that provides the ability to include text into our BIML code.  No big deal right?  Well perhaps not, however, if we think about how we can use this feature a little deeper, we’ll see there’s some very powerful capability just under the covers. 

Consider for example, using BIML Script to define a large number of packages using a standard template from different source systems.  We may want to ‘tag’ each package with a tag that specifies the system.  We could a that tag to specify the system within each package and then use the value of the tag later in our script (say for example creating a master package that groups all the child packages of one system).

Lets look at a simple example which follows this scenario. In the script below, I generate 4 packages (which don’t do anything) and have an annotation called ENV in each of them.  The annotation has the Value ‘Test’.  You’ll also notice that I’ve specified this script as tier 1 (meaning that its executed first).

<#@ template language="C#" tier="1" #>
<# string _env="Test"; #>
  <Biml xmlns="http://schemas.varigence.com/biml.xsd">
    <Packages>
      <# for(int i=1;i<5;i++){ #>
        <Package Name="Package<#= i.ToString() #>" ConstraintMode="Linear">
          <Annotations>
            <Annotation Tag="ENV"><#= _env #></Annotation>
          </Annotations>
        </Package>
        <#} #>
    </Packages>
  </Biml>

The annotation tag (‘ENV’) is designed to add context to the package when the Biml Script is compiled/compiled.  You can’t see this if your using BIDS helper however I’ll show the expanded BIML is shown below.  Notice that each package has the tag ENV.

<Biml xmlns="http://schemas.varigence.com/biml.xsd">
	<Packages>
	<Package Name="Package1" ConstraintMode="Linear">
		<Annotations>
			<Annotation Tag="ENV">Test</Annotation>
            </Annotations>
	</Package>
        <Package Name="Package2" ConstraintMode="Linear">
		<Annotations>
		<Annotation Tag="ENV">Test</Annotation>
            </Annotations>
		</Package>
        		<Package Name="Package3" ConstraintMode="Linear">
			<Annotations>
				<Annotation Tag="ENV">Test</Annotation>
            </Annotations>
		</Package>
        		<Package Name="Package4" ConstraintMode="Linear">
			<Annotations>
				<Annotation Tag="ENV">Test</Annotation>
            </Annotations>
		</Package>
            </Packages>
</Biml>

Now, I can now use that tag in other BIML scripts.  So, (for example) suppose I want a master package that execute my ‘Test’ packages.  All I would have to do is iterate over each of my packages (in the solution) and test each to see if they belonged to the ‘Test’ ENV(environment).  If they did contain that ENV value, I just include them in an execute package task.  Here’s how the second script looks;

 
<#@ template language="C#" tier="2" #>
  <Biml xmlns="http://schemas.varigence.com/biml.xsd">
    <Packages>
      <Package Name="MASTER" ConstraintMode="Linear">
        <Tasks>
          <# foreach (var _package in RootNode.Packages){
					   if (_package.GetTag("ENV")=="Test"){#>
          <ExecutePackage Name="Run <#= _package.Name #>">
            <Package PackageName="<#= _package.Name #>" />
          </ExecutePackage>
          <#} } #>
        </Tasks>
      </Package>
    </Packages>
  </Biml>

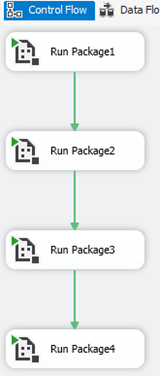
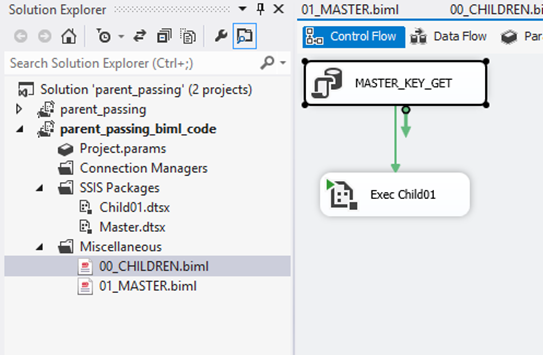
In the code above, you can see how I reference the a packages tag using the GetTag method.  Also note that the tier for this package is 2 so its executed after the prior script.  Once compiled, the output is a master package that executes each child (as below);

image

Of course this is a really simple example and you may suggest you could achieve something similar using the package name.  For example you could iterate over each package using the foreach (var _package in RootNode.Packages) above and reference _package.Name. 

This approach may work (of course) however, it relies on your package name fully encapsulating the functionality of all possible annotations – a process that could be very messy.  Suppose, I wanted to include creator, ‘ETL Stage’, ETL Version etc, soon my package name would be unmanageable.

If you are using BIDS helper, you may also consider using a different visual studio project for each ‘package type’, purpose and environment.  Again, this solution may work however, lets consider our original proposition.  We are using exactly the same pattern with different meta-data (that is, the environment).  Wouldn’t it make things simple to maintain this within the one solution?

This is where MIST can really help with development.  I use the same BIML script to generate multiple packages which are all held within the same solution, they are then compiled into different Visual Studio solutions.  Put simply, MIST allows me to keep everything in the one place.

Building the Master Child Execution with BIML

In a previous post we looked at using BIML to execute a stored proc in order to assign a return value to a variable in BIDS.  The use case for this is pretty simple, when we execute a package, we want to get an ID for the execution and then record execution information against that ID.  When we execute packages through a master and child arrangement, we need to do two things.  Firstly, the master package gets an execution id (to record the batch) and secondly, each child package execution gets its own id (relative to the parent) to record its own execution.  This is the classic application of header / detail relationships as seen in the following diagram.

image

If you’d like to build this in your environment, here’s the SQL (I’ve used an ETL_FRAMEWORK schema and included some procs to return return and audit_id)

USE [EXAMPLES]
GO

/* Header Table */
CREATE TABLE [ETL_FRAMEWORK].[MASTER_EXEC](
	[RUN_ID] [int] IDENTITY(1,1) NOT NULL,
	[JOB_NAME] [nvarchar](256) NULL,
	[START_DT] [datetime] NULL DEFAULT (getdate()),
 CONSTRAINT [pk_etl_framework_master_exec] PRIMARY KEY CLUSTERED ([RUN_ID])
);

/* child table */
CREATE TABLE [ETL_FRAMEWORK].[MASTER_CHILD_EXEC](
	[RUN_ID] [int] NULL,
	[CHILD_ID] [int] IDENTITY(1,1) NOT NULL,
	[JOB_NAME] [nvarchar](256) NULL,
	[START_DT] [datetime] NULL DEFAULT (getdate()),
 CONSTRAINT [pk_etl_framework_master_child_exec] PRIMARY KEY CLUSTERED ([CHILD_ID]) 
 );

ALTER TABLE [ETL_FRAMEWORK].[MASTER_CHILD_EXEC]  WITH CHECK ADD  CONSTRAINT [fk_etl_framework_master_child_exec_child_id] FOREIGN KEY([RUN_ID])
REFERENCES [ETL_FRAMEWORK].[MASTER_EXEC] ([RUN_ID])
ON DELETE CASCADE
;

ALTER TABLE [ETL_FRAMEWORK].[MASTER_CHILD_EXEC] CHECK CONSTRAINT [fk_etl_framework_master_child_exec_child_id]
;


/* proc for master_id */
CREATE PROC [ETL_FRAMEWORK].[MASTER_EXEC_ID_GET]
(
  @JOB_NAME NVARCHAR(256)
)
AS
BEGIN
 SET NOCOUNT ON;
 INSERT INTO ETL_FRAMEWORK.MASTER_EXEC(JOB_NAME) VALUES(@JOB_NAME);
 RETURN IDENT_CURRENT('ETL_FRAMEWORK.MASTER_EXEC');
END;

/* proc for child_id (requires master_id) */
CREATE PROC [ETL_FRAMEWORK].[MASTER_CHILD_EXEC_ID_GET]
(
  @RUN_ID INT 
  , @JOB_NAME NVARCHAR(256)
)
AS
BEGIN
 SET NOCOUNT ON;
 INSERT INTO ETL_FRAMEWORK.MASTER_CHILD_EXEC(RUN_ID, JOB_NAME) VALUES(@RUN_ID, @JOB_NAME);
 RETURN IDENT_CURRENT('ETL_FRAMEWORK.MASTER_CHILD_EXEC');
END;

/****************************************************/
/*	Want an example of how it runs ? Try this		*/
/****************************************************/
declare @master_id int; 
declare @child_id int ;;
exec @master_id = [ETL_FRAMEWORK].[MASTER_EXEC_ID_GET] 'TEST'
print @master_id;
exec @child_id = [ETL_FRAMEWORK].[MASTER_CHILD_EXEC_ID_GET] @master_id, 'TEST CHILD';
print @child_id ;

Now to BIML

Our solution is pretty simple – the parent fires first, gaining a id (fire the proc [ETL_FRAMEWORK].[MASTER_EXEC_ID_GET] ) and then passes this variable to the child package.  In the child package, we’ve registered MASTER_AUDIT_KEY as a parameter with the execute package task passing the variable down to the child.  We can see this in the two images below;

image

image

You’ll also notice that I have 2 biml files to build the package(s), these are provided in full as;

00_CHILDREN

<#@ template  language="C#" tier="1" #>
<Biml xmlns="http://schemas.varigence.com/biml.xsd">
  <Connections>
    <OleDbConnection Name="MetaData" ConnectionString="Provider=SQLOLEDB;Data Source=localhost\SQL2014;Integrated Security=SSPI;Initial Catalog=EXAMPLES" />
  </Connections>
  <Packages>
    <Package Name="Child01" ConstraintMode="Linear" ProtectionLevel="EncryptSensitiveWithUserKey" >
      <Parameters>
        <Parameter DataType="Int32" Name="MASTER_AUDIT_KEY">-1</Parameter>
      </Parameters>
      <Variables>
        <Variable DataType="Int32" Name="CHILD_AUDIT_KEY">-1</Variable>
      </Variables>
      <Tasks>
        <ExecuteSQL Name="CHILD_KEY_GET" ConnectionName="MetaData">
          <DirectInput>exec ? = [ETL_FRAMEWORK].[MASTER_CHILD_EXEC_ID_GET] ?, ?</DirectInput>
          <Parameters>
            <Parameter VariableName="User.CHILD_AUDIT_KEY" Name="0" DataType="Int32" Direction="ReturnValue" />
            <Parameter VariableName="MASTER_AUDIT_KEY" Name="1" DataType="Int32" Direction="Input" />
            <Parameter VariableName="System.PackageName" Name="2" DataType="String" Length="50" Direction="Input" />
          </Parameters>
        </ExecuteSQL>
      </Tasks>
    </Package>
  </Packages>
</Biml>

01_MASTER

<#@ template  language="C#" tier="2" #>
  <Biml xmlns="http://schemas.varigence.com/biml.xsd">
    <Packages >
      <Package Name="Master" ConstraintMode="Linear" ProtectionLevel="EncryptSensitiveWithUserKey" >
        <Variables>
          <Variable DataType="Int32" Name="MASTER_AUDIT_KEY">-1</Variable>
        </Variables>
        <Tasks>
          <ExecuteSQL Name="MASTER_KEY_GET" ConnectionName="MetaData">
            <DirectInput>exec ? = [ETL_FRAMEWORK].[MASTER_EXEC_ID_GET] ?</DirectInput>
            <Parameters>
              <Parameter VariableName="User.MASTER_AUDIT_KEY" Name="0" DataType="Int32" Direction="ReturnValue" />
              <Parameter VariableName="System.PackageName" Name="1"  DataType="String" Length="50" Direction="Input" />
            </Parameters>
          </ExecuteSQL>
          <ExecutePackage Name="Exec Child01"  >
            <ExternalProjectPackage Package="Child01.dtsx" />
            <ParameterBindings>
              <ParameterBinding VariableName="User.MASTER_AUDIT_KEY" Name="MASTER_AUDIT_KEY" />
            </ParameterBindings>
          </ExecutePackage>
        </Tasks>
      </Package>
    </Packages>
  </Biml>

There are a few things to remember here so I’ll break each out into its own paragraph.  I’ve been over some of these points before but they are worth inclusion nevertheless.

The 2 BIML files can be executed together by selecting both, right clicking and selecting the ‘Generate SSIS Packages’ from the popup window.  The ability to do this is required because a biml snippet (for example the connection string) is defined in one code file and referenced in the other.  Naturally, the execution order is important (note the connection is defined in child) so we want to compile that (child) package first.  The use of the keyword ‘tier’ in the directive of the file determines the order of compilation for selected packages.

We can define a variable or parameter within in required scope through the tree structure of the XML document.  I’ve scoped these variables to the package (they are declared directly under the package node), however, if I wanted to restrict the scope of a variable to a container, I could declare it within the containers XML nodes.

We pass the parameter from the master package to the child through the parameter bindings tag of the ExecutePackage task.  Its pretty self explanatory (when you look at the code) but this is the focus of the post so its probably worth at least calling it out 🙂

BIML, Stored Procedures and Return Parameters

Despite the improved logging features that have been incorporated into SQL2012+, I am a great fan of defining your own logging methods.  The most common method for this is having a package recognised by an ‘audit key’ and then using that key as a base point to record information that you want throughout the package.  For example, get the key (at the same time record the package start), then record success, failure, row counts, variable values etc. 

When you use a master package to execute children, you associate the childs execution (key) with a master execution (key) and this opens up some really great logging.  We’ll look at how to pass those keys down to the child in the next post, but for now, lets look at how we generate and store a package key in BIML.  In our environment, we’ve got a ‘master table (MASTER_EXEC) to record (master) package execution and a stored proc (MASTER_EXEC_ID_GET) to return the identity value (when ever we fire the proc).  As a minimum, we pass the package name to that proc so we can identify the package that was run.  You can see the format of the table and the creation scripts below. 

CREATE TABLE DBO.MASTER_EXEC
(
 RUN_ID INT IDENTITY(1,1)
 , JOB_NAME NVARCHAR(256)
 , START_DT DATETIME DEFAULT(GETDATE())
)CREATE PROC DBO.MASTER_EXEC_ID_GET
(
  @JOB_NAME NVARCHAR(256)
)
AS
BEGIN
 SET NOCOUNT ON;
 INSERT INTO DBO.MASTER_EXEC(JOB_NAME) VALUES(@JOB_NAME);
 RETURN IDENT_CURRENT('DBO.MASTER_EXEC');
END

If we wanted to test this proc in SSMS, we’d use some syntax like;


DECLARE @RET INT;
EXEC @RET = [dbo].[MASTER_EXEC_ID_GET] 'Here is Some TEST Name'
PRINT @RET

Now, for the BIML.  Here, we just have to define a variable in the packages scope to hold the key  (Ive used a variable called MASTER_ID), and execute the proc.  Procedure execution occurs through an ExecuteSQL task and we assign (and capture) the stored procs parameter values through the ExecuteSql tasks parameters node.


<Biml xmlns="<a href="http://schemas.varigence.com/biml.xsd"">http://schemas.varigence.com/biml.xsd"</a>>
 <Connections>
  <OleDbConnection Name="BIML_DB" ConnectionString="Provider=SQLNCLI11;Server=(myserver);Integrated Security=SSPI;Database=BIML" />
 </Connections>
 <Packages>
  <Package Name="Master_3" ConstraintMode="Linear">
   <Variables>
    <Variable Name="MASTER_ID" DataType="Int32">-1</Variable>
   </Variables>
  <Tasks>
   <ExecuteSQL Name="AUDIT_KEY" ConnectionName="BIML_DB">
    <DirectInput>exec ? = dbo.MASTER_EXEC_ID_GET ?</DirectInput>
    <Parameters>
      <Parameter VariableName="User.MASTER_ID" Name="0" DataType="Int32" Direction="ReturnValue" />
      <Parameter VariableName="System.PackageName" Name="1" DataType="AnsiString" Length="256" Direction="Input" />
    </Parameters>
  </ExecuteSQL>
 </Tasks>
 </Package>
 </Packages> 
</Biml>

You can see that the SQL statement (in BIML) mirrors what we would otherwise do in SQL.  The BIML parameter definition does not need to specify the parameters by name (rather by their ordinal position in the SQL statement) and we also specify the direction.  This mimics exactly what we would do in SSIS.

BIML – Importing Text Files

Here’s a BIML snippet for reading data from a text file.  If you’ve read the prior post about pushing data (from a table) to a text file, you’ll see a lot of the same constructs.  There is;

  1. A connection object (ie the FlatFileConnection) that specifies a path to a file.  The connection requires a FileFormat.
  2. A FileFormat which specifies the nature of the file (ie columns, data types, delimiters etc)
  3. The data flow object (ie the Source in the DataFlow which is a FlatFileSource).

I do not think there is too much complexity in the Connection or [DataFlow] Source.  There are really only a few attributes that need to be defined and, if you think about the nature of the task we are trying to achieve, there are all required.

What is the most interesting is the specification of the FlatFileFormat.  This defines the nature of the data that we are connecting to.  Both at a header and detail level.  For example consider the delimiter constructs for the header (HeaderRowDelimiter).  You would think that the delimiter is applicable to the entire file but this is not the case and it also needs to be specified on a column by column basis.  Finally, we also need to specify the new line on the last column.  Perhaps that’s not so intuitive since we specify the row delimiter in the header section of the Format.

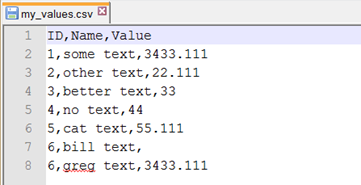
So here is what we are trying to import.

image

And here is the BIML snippet to import it.


<Biml xmlns="http://schemas.varigence.com/biml.xsd">
    <Connections>
        <FlatFileConnection Name="my_import" FileFormat="my_values" FilePath="C:\temp\my_values.csv" />
    </Connections>
    <FileFormats>
        <FlatFileFormat Name="my_values" ColumnNamesInFirstDataRow="true" RowDelimiter="CRLF" HeaderRowDelimiter="Comma" CodePage="1252" IsUnicode="false">
            <Columns>
                <Column Name="ID" DataType="Int32" Delimiter="Comma" />
                <Column Name="Name" DataType="AnsiString" Length="255" Delimiter="Comma" />
                <Column Name="Value" DataType="Double" Delimiter="CRLF"  />
            </Columns>
        </FlatFileFormat>
    </FileFormats>
    <Packages>
        <Package Name="import_MyValue" ConstraintMode="Linear" ProtectionLevel="EncryptAllWithUserKey">
            <Tasks>
                <Dataflow Name="load_values">
                    <Transformations>
                        <FlatFileSource Name="src_values" ConnectionName="my_import" />
                    </Transformations>
                </Dataflow>
            </Tasks>
        </Package>
    </Packages>
</Biml>

Cleaning Your Database with BIML

Blow it away and start again 🙂

When we are working in a dynamic environment, we need to push through changes quickly and a prerequisite for this means starting from scratch.  Starting with a blank database and deploying the build from a clean state.  If you can’t drop and recreate the database, then the next best option is to clean it out, delete all the objects and recreate them as part of your build.

You can scrub tables in several ways.  The one that I propose here is a sequential (and dynamic method) that is relatively straight forward (and of course we can look into BIML for it).  The template for the pattern is given in the pseudo code below;

Assume there are tables to delete
While there are tables to delete then
  table_list <- get the list of tables
  foreach table in table_list, try to delete the table
  determine if there are (still) tables to delete

In, SSIS, this looks like the following pattern and I have included a list of variables that I used to run the package.  There some more advanced features of SSIS being used here which I will call out;

  1. We use TABLE_COUNT (initial value 1) to control the continued execution of the package (that is, the WHILE_TABLE_EXISTS container).  This container runs while the TABLE_COUNT value is greater than 1 (or my database still has tables).
  2. The TABLES_IN_DB is an object that holds a list of table names, this is the result of the SQL Command GET_TABLE_LIST.  The purpose here, is to query the database metadata in order to determine a list of names.
  3. The iterator FOREACH_RECORD_IN_TALBE_LIST enumerates over each record in the TALBES_IN_DB (assigning the table name to the variable TABLE_NAME).  Within that container, we generate what SQL to execute (ie the drop command) in the GENERATE_SQL expression by assigning it to the SQL variable.  Then we execute that variable via an Execute Command.  Since we do not want the task to fail if the command does not work (after all there may be some dependencies between tables and execution order).
  4. Finally, after the first batch of executions has run (and hopefully all the tables are deleted), we recount the tables in the database, storing the values in the TABLE_COUNT variable.  Control is then passed back to the WHILE_TABLES_EXIST to see if there are tables in the database and determine whether the process should begin again.

image

 In BIML

This process is very generic and can be applied in any database.  There’s also no need for BIML Script in code (since we do not rely on the generation of tasks which specifically rely on data).  Here is the full snippet;


<Biml xmlns="http://schemas.varigence.com/biml.xsd">

<Connections>
    <OleDbConnection Name="FM_MYSQL" ConnectionString="provider=MSDataShape;server=foodmart_mysql;uid=foodmart_admin;pwd=whats_my_password?" DelayValidation="true"  />
</Connections>

    <Packages>
        <Package Name="01-Clean_MySQL" ProtectionLevel="EncryptAllWithUserKey" ConstraintMode="Linear">

            <!-- these variables are created in the packages scope -->
            <Variables>
                <Variable Name="TABLES_IN_DB" DataType="Object">
                </Variable>
                <Variable Name="TABLE_COUNT" DataType="Int32">1</Variable>
            </Variables>

            <Tasks>

                <!-- the first container (while records exists) note the evaluation expresssion -->
                <ForLoop Name="WHILE TABLES EXIST" ConstraintMode="Linear">
                    <LoopTestExpression>@TABLE_COUNT>=1</LoopTestExpression>

                    <!-- tasks within the container are contained in a tasks tag -->
                    <Tasks>

                        <!-- get the list of table (names) .. note the record set is assigned to the variable TABLES_IN_DB -->
                        <ExecuteSQL Name="GET_TABLE_LIST" ResultSet="Full" ConnectionName="FM_MYSQL">
                            <DirectInput>SELECT TABLE_NAME FROM INFORMATION_SCHEMA.TABLES WHERE TABLE_SCHEMA='foodmart';</DirectInput>
                            <Results>
                                <Result Name="0" VariableName="User.TABLES_IN_DB" />
                            </Results>
                        </ExecuteSQL>

                        <!-- Iterate over each record in the TABLES_IN_DB variable
                            Note how we assign the current record to the TABLE_NAME variable -->
                        <ForEachAdoLoop Name="FOREACH_RECORD_IN_TABLE_LIST" SourceVariableName="User.TABLES_IN_DB" ConstraintMode="Linear">
                            <Variables>
                                <Variable Name="TABLE_NAME" DataType="String">
                                </Variable>
                                <Variable Name="SQL" DataType="String">
                                </Variable>
                            </Variables>
                            <VariableMappings>
                                <VariableMapping Name="0" VariableName="User.TABLE_NAME" />
                            </VariableMappings>

                            <Tasks>

                                <!-- Generate the SQL Statement –>
                                <Expression Name="GENERATE SQL" Expression="@[User::SQL]=&quot;DROP TABLE foodmart.&quot; + @[User::TABLE_NAME]"/>
                                <!-- Execute the SQL Statement (based on the user variable (SQL)) –>

                                <ExecuteSQL Name="DELETE TABLE" ConnectionName="FM_MYSQL" DelayValidation="true" FailPackageOnFailure="false">
                                    <VariableInput VariableName="User.SQL" />
                                </ExecuteSQL>

                            </Tasks>

                        </ForEachAdoLoop>

                        <!-- Recount Tables and store in the variable (which is passed back to the parent container)  -->
                        <ExecuteSQL Name="GET_TABLES_COUNT" ResultSet="SingleRow" ConnectionName="FM_MYSQL">
                            <DirectInput>SELECT COUNT(*) FROM INFORMATION_SCHEMA.TABLES WHERE TABLE_SCHEMA='foodmart';</DirectInput>
                            <Results>
                                <Result Name="0" VariableName="User.TABLE_COUNT" />
                            </Results>
                        </ExecuteSQL>

                    </Tasks>
                </ForLoop>
            </Tasks>
        </Package>
    </Packages>

</Biml>

You might notice that I am using an MYSQL ODBC database connection.  Other features are commented in the code.

As stated, there is no reliance on BIML Script here, so you may ask ‘Why use BIML?’.  The reason for this is that the snippet includes samples of a few controls and how they are configured in different circumstances.

Biml XIII – The Biml Script for the Entire SSAS Database

This final post on biml SSAS processing and provides the full script to produce two packages.  It really ties in the first 2 posts to provide a complete solution for our processing scenario.  Remember, our goal is to point our biml at a SSAS database and have a processing package built that only processes the last 2 fact partitions of each measure group based on their last processed date.

The First Method

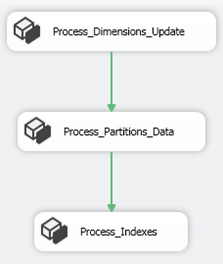
Firstly, we look at a very conventional arrangement that would process dimensions, partitions and indexes.  This looks like the image below.  In order to get the most performance (lowest processing time), we need to specify that each processing task uses parallelisation.

image

The code is similar to prior posts so we wont dwell on it too much.  Basically, we use AMO (note the reference to the AMO dll in the first line) to connect to our cube, discover dimensions and partitions and these in an iterative manner to each processing task.  The two methods in the C# code of importance are DimensionKeys (which returns all dimensions in the database) and Partitions (which returns the last two processed partitions for our intended measure group).

<#@ assembly name="C:\Program Files (x86)\Microsoft SQL Server\110\SDK\Assemblies\Microsoft.AnalysisServices.dll" #> 

<#@ import namespace="System.Collections.Generic" #>
<#@ import namespace="Microsoft.AnalysisServices" #> 

<#@ template language="C#" #> 

<#
    String _ssas_server = @".\SQL2008R2";
    String _ssas_database = "Adventure Works DW 2008R2";
    int _max_partitions = 2;
#> 

<#+ 
Dictionary<string, string> DimensionKeys(string Server, string Database)
{
     Dictionary<string, string> _dimensions = new Dictionary<string, string>();
     Server _ssas_server = new Server();
     _ssas_server.Connect(Server); 

     Database _db = _ssas_server.Databases[Database];
     foreach (Dimension _dim in _db.Dimensions)
         _dimensions.Add(_dim.ID, _dim.Name); 

     _ssas_server.Disconnect();
     _ssas_server.Dispose(); 

     return _dimensions;
} 

public static List<PartitionStruct> Partitions(string ServerName, string DatabaseName, string CubeId, string MeasureGroupId)
{
        var _ret = new List<PartitionStruct>(); 

        Server _ssas_server = new Server();
        _ssas_server.Connect(ServerName);
        Database _db = _ssas_server.Databases[DatabaseName];
        Cube _c = _db.Cubes[CubeId];
        MeasureGroup _mg = _c.MeasureGroups[MeasureGroupId]; 

        foreach (Partition _p in _mg.Partitions)
        {
                _ret.Add(new PartitionStruct(_p.Name.ToString(), _p.ID.ToString(), _p.LastProcessed));
        }
        _ssas_server.Disconnect();
        _ssas_server.Dispose(); 

        _ret.Sort((y, x) => x.PROCESS_DATE.CompareTo(y.PROCESS_DATE)); 

        return _ret;
} 

public struct PartitionStruct
{
        public readonly string PARTITION_NAME;
        public readonly string PARTITION_ID;
        public readonly DateTime PROCESS_DATE;
        public PartitionStruct(string partition_NAME, string partition_ID, DateTime process_DATE)
        {
                PARTITION_NAME = partition_NAME;
                PARTITION_ID = partition_ID;
                PROCESS_DATE = process_DATE;
        } 

} 

#>

<Biml xmlns="http://schemas.varigence.com/biml.xsd">
  <Connections>
    <AnalysisServicesConnection Name="olap" ConnectionString="Data Source=<#= _ssas_server #>;PROVIDER=MSOLAP;Impersonation Level=Impersonate;" Server="<#= _ssas_server #>" />
  </Connections>
  <Packages>
    <Package Name="SSAS_PROCESSING_ssas_process_all" ConstraintMode="Linear" ProtectionLevel="EncryptAllWithUserKey">
         <Tasks>
            <AnalysisServicesProcessing Name="Process_Dimensions_Update" ConnectionName="olap" ProcessingOrder="Parallel" >
              <ProcessingConfigurations>
                <# 
                Dictionary<string, string> _dimensions = DimensionKeys("Data Source=" + _ssas_server , _ssas_database);
                foreach (string _dim in _dimensions.Keys){ #>            
                        <DimensionProcessingConfiguration DatabaseId="<#= _ssas_database #>" ProcessingOption="ProcessUpdate"  DimensionId="<#= _dim #>" />
                <# } #>
                  </ProcessingConfigurations>
            </AnalysisServicesProcessing>
            <AnalysisServicesProcessing Name="Process_Partitions_Data" ConnectionName="olap" ProcessingOrder="Parallel">
                <ProcessingConfigurations>
                <#    
                Server _ssas_server_ = new Server();
                _ssas_server_.Connect(_ssas_server); 

                Database _db = _ssas_server_.Databases[_ssas_database];
                foreach (Cube _c in _db.Cubes) 
                { 
                    foreach (MeasureGroup _mg in _c.MeasureGroups)
                    {  
                        List<PartitionStruct> _listPartitions = Partitions(_ssas_server, _ssas_database, _c.ID, _mg.ID);
                        for (int _i = 0; _i < _max_partitions & _i < _listPartitions.Count; _i++ ) { #>
                        <PartitionProcessingConfiguration DatabaseId="<#= _db.ID #>" CubeId="<#= _c.ID #>"  MeasureGroupId="<#= _mg.ID #>" PartitionId="<#= _listPartitions[_i].PARTITION_ID #>" ProcessingOption="ProcessData" />
                     <# }
                    }
                    } 
                    #>
                </ProcessingConfigurations>
            </AnalysisServicesProcessing>
            <AnalysisServicesProcessing Name="Process_Indexes" ConnectionName="olap" ProcessingOrder="Parallel">
                <ProcessingConfigurations>
                    <# 
                    _db = _ssas_server_.Databases[_ssas_database];
                    foreach (Cube _c in _db.Cubes) { #>
                    <CubeProcessingConfiguration ProcessingOption="ProcessIndexes"  DatabaseID="<#= _db.ID #>" CubeId="<#= _c.ID #>"/>
                    <# } 
                       _ssas_server_.Disconnect();
                    #>
                </ProcessingConfigurations>
            </AnalysisServicesProcessing>
        </Tasks>
    </Package>
  </Packages>
</Biml>

A slight word of caution … If you look into the biml code, you will see that we explicitly set the ProcessingOrder as parallel.  This specifies that the Processing Order (mode) for the task should be in parallel and that the batch XMLA sent to your SSAS Server should include that option.  Unfortunately, this may not materialise on all versions of BIDS & BIML and the default (sequential) may be used.  I would check the outcome before implementation.

Method 2

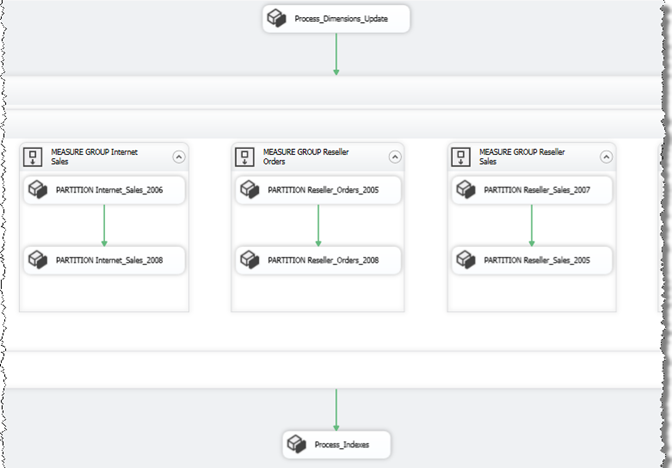
Our second approach is essentially the same as the first, however, in this approach, we encapsulate each each measure group processing command in its own container with sequential constraints between each partition process.  Why?  Because we want to ensure that our partitions are processed according to last processed date.  That is, the last 2 processed partitions should be processed and we should process them in the order that we originally processed them.  If we add a new partition, we want to ensure that the one with the oldest data drops off the list.  You’ll also notice that we use SSIS containers to gain parallelisation for each Cube and Measure Group.

This code relies on the same methods (DimensionKeys and Partitions) used in the prior to build its output.

image

<#@ assembly name="C:\Program Files (x86)\Microsoft SQL Server\110\SDK\Assemblies\Microsoft.AnalysisServices.dll" #>
<#@ import namespace="System.Collections.Generic" #>
<#@ import namespace="Microsoft.AnalysisServices" #> 
<#@ template language="C#" #> 

<#
    String _ssas_server_name = @".\SQL2008R2";
    String _ssas_database_name = "Adventure Works DW 2008R2";
    int _max_partitions = 2;
#>
<#+ 

Dictionary<string, string> DimensionKeys(string Server, string Database)
{
     Dictionary<string, string> _dimensions = new Dictionary<string, string>();
     Server _ssas_server = new Server();
     _ssas_server.Connect(Server); 

     Database _db = _ssas_server.Databases[Database];
     foreach (Dimension _dim in _db.Dimensions)
         _dimensions.Add(_dim.ID, _dim.Name); 

     _ssas_server.Disconnect();
     _ssas_server.Dispose(); 

     return _dimensions;
} 

public static List<PartitionStruct> Partitions(string ServerName, string DatabaseName, string CubeId, string MeasureGroupId, int PartitionNum)
{
        /* returns a number of partitions (PartitionNum)
         * based on their processed_date -> ie last n processed partitions
         * sorted in asc order
         */ 
        List<PartitionStruct> _ret = new List<PartitionStruct>(); 

        Server _ssas_server = new Server();
        _ssas_server.Connect(ServerName);
        Database _db = _ssas_server.Databases[DatabaseName];
        Cube _c = _db.Cubes[CubeId];
        MeasureGroup _mg = _c.MeasureGroups[MeasureGroupId]; 

        foreach (Partition _p in _mg.Partitions)
        {
                _ret.Add(new PartitionStruct(_p.Name.ToString(), _p.ID.ToString(), _p.LastProcessed));
        }
        _ssas_server.Disconnect();
        _ssas_server.Dispose(); 

        _ret.Sort((y, x) => x.PROCESS_DATE.CompareTo(y.PROCESS_DATE)); 

        /* get first PartitionNum */
        while (_ret.Count > PartitionNum)
                _ret.RemoveAt(PartitionNum); 

        // ret asc
        _ret.Sort((x, y) => x.PROCESS_DATE.CompareTo(y.PROCESS_DATE)); 
        return _ret;
} 

public struct PartitionStruct
{
        public readonly string PARTITION_NAME;
        public readonly string PARTITION_ID;
        public readonly DateTime PROCESS_DATE;
        public PartitionStruct(string partition_NAME, string partition_ID, DateTime process_DATE)
        {
                PARTITION_NAME = partition_NAME;
                PARTITION_ID = partition_ID;
                PROCESS_DATE = process_DATE;
        }
}
#> 

<Biml xmlns="http://schemas.varigence.com/biml.xsd">
    <Connections>
        <AnalysisServicesConnection Name="olap" ConnectionString="Data Source=<#= _ssas_server_name #>;PROVIDER=MSOLAP;Impersonation Level=Impersonate;" Server="<#= _ssas_server_name #>" />
    </Connections>
    <Packages>
        <Package Name="SSAS_PROCESSING <#= _ssas_database_name #>" ConstraintMode="Linear">
            <Tasks> 

                <AnalysisServicesProcessing Name="Process_Dimensions_Update" ConnectionName="olap" ProcessingOrder="Parallel" >
                      <ProcessingConfigurations>
                        <# 
                            Dictionary<string, string> _dimensions = DimensionKeys("Data Source=" + _ssas_server_name , _ssas_database_name);
                                foreach (string _dim in _dimensions.Keys){ #>            
                                    <DimensionProcessingConfiguration DatabaseId="<#= _ssas_database_name #>" ProcessingOption="ProcessUpdate"  DimensionId="<#= _dim #>" />
                        <# } #>
                      </ProcessingConfigurations>
                </AnalysisServicesProcessing> 

                <Container Name="FACT_PROCESSING" ConstraintMode="Parallel">
                    <Tasks>
                    <#
                    Server _ssas_server_ = new Server();
                    _ssas_server_.Connect(_ssas_server_name);
                    Database _db = _ssas_server_.Databases[_ssas_database_name];
                    foreach (Cube _c in _db.Cubes) { #>
                        <Container Name="CUBE <#= _c.Name #>" ConstraintMode="Parallel">
                            <Tasks>
                                <# foreach (MeasureGroup _mg in _c.MeasureGroups){#>
                                <Container Name="MEASURE GROUP <#= _mg.Name #>" ConstraintMode="Linear">
                                    <Tasks>
                                        <# List<PartitionStruct> _listPartitions = Partitions(_ssas_server_name, _ssas_database_name, _c.ID, _mg.ID, _max_partitions);
                                           foreach (PartitionStruct _partition in _listPartitions) { #>
                                              <AnalysisServicesProcessing Name="PARTITION <#= _partition.PARTITION_NAME #>" ConnectionName="olap">
                                                  <ProcessingConfigurations>
                                                      <PartitionProcessingConfiguration CubeId="<#= _c.ID #>" DatabaseId="<#= _db.ID #>" MeasureGroupId="<#= _mg.ID #>" PartitionId="<#= _partition.PARTITION_ID #>" ProcessingOption="ProcessData" />
                                                  </ProcessingConfigurations>
                                              </AnalysisServicesProcessing> 
                                        <# }#>
                                    </Tasks>
                                </Container>
                                <# }  #>
                            </Tasks>
                        </Container>
                    <#} #>
                    </Tasks>
                </Container> 

            <AnalysisServicesProcessing Name="Process_Indexes" ConnectionName="olap" ProcessingOrder="Parallel">
                <ProcessingConfigurations>
                    <# 
                    _db = _ssas_server_.Databases[_ssas_database_name];
                    foreach (Cube _c in _db.Cubes) { #>
                    <CubeProcessingConfiguration ProcessingOption="ProcessIndexes"  DatabaseID="<#= _db.ID #>" CubeId="<#= _c.ID #>"/>
                    <# } 
                       _ssas_server_.Disconnect();
                    #>
                </ProcessingConfigurations>
            </AnalysisServicesProcessing> 

            </Tasks>
        </Package>
    </Packages>
</Biml>

Conclusion

You might suggest that this process is a very long way to build a processing schedule – and you may be right.  If you had to build it from scratch once to create a package that does some processing, you might have achieved it faster by hand.  However, here’s the thing about automation … you don’t have to code it, its there for you can you can use it to build out your packages and now package creation takes 10 sec! 

Biml XXII – A Framework for Partition Processing

Following on from the last post on dimension processing, the next operation in our SSAS processing strategy is to process measure group partitions.  If we remember our scenario, our SSAS database takes too long to process (when we try a full process), so we are forced to process dimensions using a ProcessUpdate and then specific partitions using ProcessData.  Of course we only want to process those partitions that have the most recent data and we want to automate this using biml.  That is, we want to point our biml package at a SSAS database and have the package generated by some logic.

The Logic
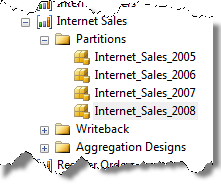
image Lets assume that we have a group of partitions in each measure group (see left).  We will assume that the last partitions processed for the measure group are the most current and therefore, we should choose the last n number of partitions to process (this is based on the individual partitions last processed date).

If you think about how you would manage this in a system, consider adding 2009 data.  When 2009 comes along, we add a partition and process it.  Now that this ‘new’ partition has been added, we want to continue processing it along with the (last processed) partition (ie 2008).

In summary, our processing logic needs to look for the last n partitions based on the last process date of the measure group partitions.

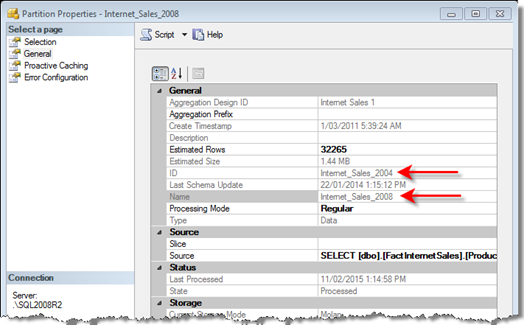
I will explain this in the code below but there is one little (perhaps very confusing) issue that I’ve found with Adventure Works and you may find this in your version.  If I look at the properties for the Internet Sales 2008 partition, I can see the date it was last processed, its name and its ID.  In my code, I’ll be using ID but take a look at the ID and Name.  The ID is Internet_Sales_2004 however, the name is Internet_Sales_2008 … confusing right?
image

What i need is a way to iterate over the partitions in a SSAS database determining which ones where processed last (say for example the last 2 partitions).  I can demonstrate this in the following psuedo code;

 
server <- connect to SSAS server
database <- connect to a database on server
foreach (cube in database)
{
    foreach (measure group in cube)
    {
        foreach (partition in measure group)
            get the last n processed partitions
    }
} 

If I run this against my Adventure Works instance, I may get something like this (assuming that I simply print the last 2 partitions).  We can see, the Cube, Measure Group and Partitions at individual levels
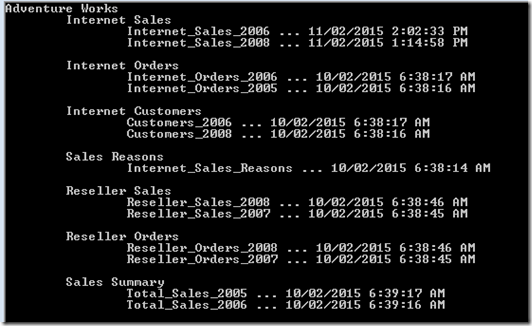
image

Here’s the code to produce that output.  We can see the iteration of cubes, measure groups and partitions.  Note that I’ve also defined a function Partitions to return a sorted table of partitions with the PARTITION_NAME, PARTITION_ID and (last) PROCESS_DT.  I’ll have to also include a reference to AMO.


static void Main(string[] args)
{
    string _server_name = @"Data Source=.\SQL2008R2";
    string _database_name = "Adventure Works DW 2008R2";
    int _max_partitions = 2;
    

    Server _ssas_server = new Server();
    _ssas_server.Connect(_server_name); 

    Database _db = _ssas_server.Databases[_database_name];
    foreach (Cube _c in _db.Cubes)
    {
        Console.WriteLine(_c.Name);
        foreach (MeasureGroup _mg in _c.MeasureGroups)
        {
            Console.WriteLine("\t{0}", _mg.Name);
            var _listPartitions = Partitions(_ssas_server, _ssas_database, _c.ID, _mg.ID);
            for (int _i = 0; _i < _max_partitions & _i < _listPartitions.Count; _i++ )
                Console.WriteLine("\t\t{0},{1}", _listPartitions[_i].PARTITION_NAME, _listPartitions[_i].PROCESS_DATE);


            Console.WriteLine();
        }
    } 

} 


public static List<PartitionStruct> Partitions(string ServerName, string DatabaseName, string CubeId, string MeasureGroupId)
{
        var _ret = new List<PartitionStruct>(); 

        Server _ssas_server = new Server();
        _ssas_server.Connect(ServerName);
        Database _db = _ssas_server.Databases[DatabaseName];
        Cube _c = _db.Cubes[CubeId];
        MeasureGroup _mg = _c.MeasureGroups[MeasureGroupId]; 

        foreach (Partition _p in _mg.Partitions)
        {
                _ret.Add(new PartitionStruct(_p.Name.ToString(), _p.ID.ToString(), _p.LastProcessed));
        }
        _ssas_server.Disconnect();
        _ssas_server.Dispose(); 

        _ret.Sort((y, x) => x.PROCESS_DATE.CompareTo(y.PROCESS_DATE)); 

        return _ret;
} 

public struct PartitionStruct
{
        public readonly string PARTITION_NAME;
        public readonly string PARTITION_ID;
        public readonly DateTime PROCESS_DATE;
        public PartitionStruct(string partition_NAME, string partition_ID, DateTime process_DATE)
        {
                PARTITION_NAME = partition_NAME;
                PARTITION_ID = partition_ID;
                PROCESS_DATE = process_DATE;
        }
}

Over To Biml

In using biml, I simply want to create a package that has a single PartitionProcessing task in it.  Partition processing is just a processing configuration for the AnalysisServicesProcessing task and its use should become apparent once we see the generated biml.  We simply specify the partition that we want to process.  Our complete biml script is;


<#@ assembly name="C:\Program Files (x86)\Microsoft SQL Server\110\SDK\Assemblies\Microsoft.AnalysisServices.dll" #> 

<#@ import namespace="System.Data" #>
<#@ import namespace="Microsoft.AnalysisServices" #> 

<#@ template language="C#"  #>
<#
    String _ssas_server = @".\SQL2008R2";
    String _ssas_database = "Adventure Works DW 2008R2";
    String _process_type = "ProcessData";
    int _max_partitions = 2;
#> 

<#+
       public static List<PartitionStruct> Partitions(string ServerName, string DatabaseName, string CubeId, string MeasureGroupId)
        {
            var _ret = new List<PartitionStruct>(); 

            Server _ssas_server = new Server();
            _ssas_server.Connect(ServerName);
            Database _db = _ssas_server.Databases[DatabaseName];
            Cube _c = _db.Cubes[CubeId];
            MeasureGroup _mg = _c.MeasureGroups[MeasureGroupId]; 

            foreach (Partition _p in _mg.Partitions)
            {
                _ret.Add(new PartitionStruct(_p.Name.ToString(), _p.ID.ToString(), _p.LastProcessed));
            }
            _ssas_server.Disconnect();
            _ssas_server.Dispose(); 

            _ret.Sort((y, x) => x.PROCESS_DATE.CompareTo(y.PROCESS_DATE)); 

            return _ret;
        } 

        public struct PartitionStruct
        {
            public readonly string PARTITION_NAME;
            public readonly string PARTITION_ID;
            public readonly DateTime PROCESS_DATE;
            public PartitionStruct(string partition_NAME, string partition_ID, DateTime process_DATE)
            {
                PARTITION_NAME = partition_NAME;
                PARTITION_ID = partition_ID;
                PROCESS_DATE = process_DATE;
            } 

        }
#>
<Biml xmlns="http://schemas.varigence.com/biml.xsd">
  <Connections>
    <AnalysisServicesConnection Name="olap" ConnectionString="Data Source=<#= _ssas_server #>;PROVIDER=MSOLAP;Impersonation Level=Impersonate;" Server="<#= _ssas_server #>" />
  </Connections>
  <Packages>
    <Package Name="ProcessSassPartitions" ConstraintMode="Linear">
         <Tasks>
            <AnalysisServicesProcessing Name="Process Partitions" ConnectionName="olap" >
                <ProcessingConfigurations>     
                <#
                Server _ssas_server_ = new Server();
                _ssas_server_.Connect(_ssas_server); 

                Database _db = _ssas_server_.Databases[_ssas_database];
                foreach (Cube _c in _db.Cubes) 
                { 
                    foreach (MeasureGroup _mg in _c.MeasureGroups)
                    {  
                        List<PartitionStruct> _listPartitions = Partitions(_ssas_server, _ssas_database, _c.ID, _mg.ID);
                        for (int _i = 0; _i < _max_partitions & _i < _listPartitions.Count; _i++ ) { #>
                        <PartitionProcessingConfiguration DatabaseId="<#= _db.ID #>" CubeId="<#= _c.ID #>"  MeasureGroupId="<#= _mg.ID #>" PartitionId="<#= _listPartitions[_i].PARTITION_ID #>" ProcessingOption="ProcessData" />
                     <# }
                    }
                    } #>
                   </ProcessingConfigurations> 
            </AnalysisServicesProcessing>
        </Tasks>
    </Package>
  </Packages>
</Biml>

To see how this code generates biml, I want to validate the output, so lets test it. In Adventure Works, the 2005 and 2006 partitions in the Internet Sales measure group.  These have the ID’s Internet_Sales_2001 and Internet_Sales_2002 (the measure group ID is Fact Internet Sales 1).  Below, I can see the generated biml and verify that the correct partitions have been chosen.

image

Now, if I’ll process the 2008 partition (through SSMS) which has an ID of Internet_Sales_2004.  Assuming I processed the 2006 partition last (in the prior step), I’d expect the 2006 and 2008 partition to be in my processing list.  That’s exactly what I see (as in the screen shot below). 

image

Of course my generated package will show the names I expect (Internet_Sales_2008 and Internet_Sales_2006).
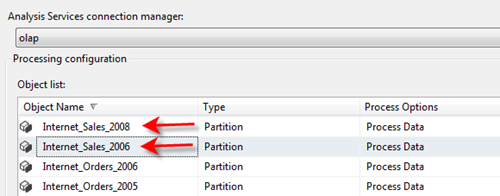
image

Conclusion

So what’s the purpose of this snippet?  It provides a way to automate the creation of a SSAS processing task by examining the meta-data of existing database partitions.  We assume that we want to continue to process each measure group’s last n partitions and the package is generated for us.
Biml XXI – A Framework for Dimension Processing

This post looks at building an SSIS package for dimension processing – we assume that you want fine control over the processing of your SSAS cube and so use different processing activities for dimensions, facts and database (more on facts and databases later).    The reason why you would want to use a different processing option of each object relates to the processing window for you database.  If you have a large amount of fact data, it may not be possible to process the entire database within the allocated time and so we move to an approach where you process the dimensions first as an update and then the measure groups (facts) that have changed data.  Dimensions have to be processed using an update so the existing fact data is not cleared.

At the end of the post, we’ll have 2 snippets.  The first puts all dimensions into a single processing task.  Through that, you can specify the degree of parallelisation (it is part of the SSAS processing control) and secondly, our package will put individual processing tasks into a sequence container (with a parallel constraint mode).  The idea of the post though, is just to specify the SSAS server and the database and then have biml generate the package for you.

Database Dimensions

In a previous post, I looked at extracting dimension data from a database.  Its important to remember that (in a well designed system), dimensions are shared across cubes (the dimension is a major object for the database) and therefore the start of our code is identifying dimensions in the database.  In order to do that, I have a function  that returns a dictionary of dimension unique names and display names).  The code requires a reference to the AMO class (in my system this was found at )

C:\Program Files (x86)\Microsoft SQL Server\110\SDK\Assemblies\Microsoft.AnalysisServices.DLL .


using System.Collections.Generic;
using Microsoft.AnalysisServices; 


static Dictionary<string, string> DimensionKeys(string Server, string Database)
{
     Dictionary<string, string> _dimensions = new Dictionary<string, string>();
     Server _ssas_server = new Server();
     _ssas_server.Connect(Server); 

     Database _db = _ssas_server.Databases[Database];
     foreach (Dimension _dim in _db.Dimensions)
         _dimensions.Add(_dim.ID, _dim.Name); 

     _ssas_server.Disconnect();
     _ssas_server.Dispose(); 

     return _dimensions;
} 

The Analysis Services Processing Task

The SSIS control flow includes a SSAS Processing task.  In biml we can implement the with a simple example that processes the Account dimension of Adventure Works (as in the following).

<Biml xmlns="http://schemas.varigence.com/biml.xsd">
  <Connections>
    <AnalysisServicesConnection Name="olap" ConnectionString="Data Source=.\SQL2008R2;PROVIDER=MSOLAP;Impersonation Level=Impersonate;" Server=".\SQL2008R2" />
  </Connections>
  <Packages>
    <Package Name="ProcessSass" ConstraintMode="Linear">
         <Tasks>
            <AnalysisServicesProcessing Name="Process_Account" ConnectionName="olap">
                  <ProcessingConfigurations>
                    <DimensionProcessingConfiguration DatabaseId="Adventure Works DW 2008R2" ProcessingOption="ProcessUpdate"  DimensionId="Dim Account" />
                  </ProcessingConfigurations>
            </AnalysisServicesProcessing>
        </Tasks>
    </Package>
  </Packages>
</Biml> 

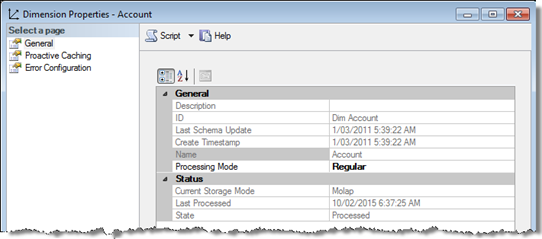
The important parts of the processing task is the processing option and the dimension id (not its name).  Of course, the dimension id may be different from its name (as the following screen image shows … remember that this is Adventure Works).

image

Naturally, if we want to process other dimensions as part of this task, we would include more DimensionProcessingConfiguration tags within the ProcessingConfiguration node.

Populating Configuration Tags.

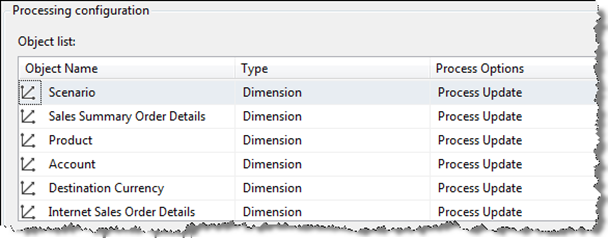
The first snippet (I’ve included the full snippet for ease of use) populates the configuration tags (as shown below)

image

I think the key takeaways for the code are the inclusion of the AnalysisServices assembly (we have not looked at this before) and the use of server, database and processing types as ‘control’ strings at the start of the code (meaning they will only need to be set once in the code).  The iteration over each dimension to add a processing configuration (dimension processing command) should not be unfamiliar if you have been following this series.


<#@ assembly name="C:\Program Files (x86)\Microsoft SQL Server\110\SDK\Assemblies\Microsoft.AnalysisServices.dll" #> 

<#@ import namespace="System.Collections.Generic" #>
<#@ import namespace="Microsoft.AnalysisServices" #> 

<#@ template language="C#" #> 

<#
    String _ssas_server = @".\SQL2008R2";
    String _ssas_database = "Adventure Works DW 2008R2";
    String _process_type = "ProcessUpdate";
#> 

<#+ 
Dictionary<string, string> DimensionKeys(string Server, string Database)
{
     Dictionary<string, string> _dimensions = new Dictionary<string, string>();
     Server _ssas_server = new Server();
     _ssas_server.Connect(Server); 

     Database _db = _ssas_server.Databases[Database];
     foreach (Dimension _dim in _db.Dimensions)
         _dimensions.Add(_dim.ID, _dim.Name); 

     _ssas_server.Disconnect();
     _ssas_server.Dispose(); 

     return _dimensions;
} 

#>

<Biml xmlns="http://schemas.varigence.com/biml.xsd">
  <Connections>
    <AnalysisServicesConnection Name="olap" ConnectionString="Data Source=<#= _ssas_server #>;PROVIDER=MSOLAP;Impersonation Level=Impersonate;" Server="<#= _ssas_server #>" />
  </Connections>
  <Packages>
    <Package Name="ProcessSass" ConstraintMode="Linear">
         <Tasks>
            <AnalysisServicesProcessing Name="Process_Dimensions" ConnectionName="olap">
                  <ProcessingConfigurations>
                    <# 
                    Dictionary<string, string> _dimensions = DimensionKeys("Data Source=" + _ssas_server , _ssas_database);
                    foreach (string _dim in _dimensions.Keys){ #>
                        <DimensionProcessingConfiguration DatabaseId="<#= _ssas_database #>" ProcessingOption="<#= _process_type #>"  DimensionId="<#= _dim #>" />
                    <# } #>
                  </ProcessingConfigurations>
            </AnalysisServicesProcessing>
        </Tasks>
    </Package>
  </Packages>
</Biml>

A Single Processing Task For Each Dimension

Alternatively, our strategy could be to create a processing task for each dimension and then wrap that in a container.  Note that the container has a parallel constraint which allows some parallel processing.  Our package will look like the following.

image


<#@ assembly name="C:\Program Files (x86)\Microsoft SQL Server\110\SDK\Assemblies\Microsoft.AnalysisServices.dll" #> 

<#@ import namespace="System.Collections.Generic" #>
<#@ import namespace="Microsoft.AnalysisServices" #> 

<#@ template language="C#" #> 

<#
    String _ssas_server = @".\SQL2008R2";
    String _ssas_database = "Adventure Works DW 2008R2";
    String _process_type = "ProcessUpdate";
#> 

<#+ 
Dictionary<string, string> DimensionKeys(string Server, string Database)
{
     Dictionary<string, string> _dimensions = new Dictionary<string, string>();
     Server _ssas_server = new Server();
     _ssas_server.Connect(Server); 

     Database _db = _ssas_server.Databases[Database];
     foreach (Dimension _dim in _db.Dimensions)
         _dimensions.Add(_dim.ID, _dim.Name); 

     _ssas_server.Disconnect();
     _ssas_server.Dispose(); 

     return _dimensions;
} 

#>

<Biml xmlns="http://schemas.varigence.com/biml.xsd">
  <Connections>
    <AnalysisServicesConnection Name="olap" ConnectionString="Data Source=<#= _ssas_server #>;PROVIDER=MSOLAP;Impersonation Level=Impersonate;" Server="<#= _ssas_server #>" />
  </Connections>
  <Packages>
    <Package Name="ProcessSass" ConstraintMode="Linear">
         <Tasks>
            <Container Name="Process Dimensions" ConstraintMode="Parallel">
            <Tasks>
            <# 
                Dictionary<string, string> _dimensions = DimensionKeys("Data Source=" + _ssas_server , _ssas_database);
                foreach (string _dim in _dimensions.Keys){ #>            
                <AnalysisServicesProcessing Name="Process_<#= _dim #>" ConnectionName="olap">
                  <ProcessingConfigurations>
                        <DimensionProcessingConfiguration DatabaseId="<#= _ssas_database #>" ProcessingOption="<#= _process_type #>"  DimensionId="<#= _dim #>" />
                  </ProcessingConfigurations>
            </AnalysisServicesProcessing>
            <# } #>
            </Tasks>
            </Container>
        </Tasks>
    </Package>
  </Packages>
</Biml>

Conclusion

This post includes two snippets for building dimension processing packages.  The approach (using ProcessUpdate) is required as the first stage of processing when the database is too big to be processed within the allowed window.