BIML VII – Extracting Data Using ODBC Destinations

In previous posts we looked at using Biml to extract data from our database tables to flat files and raw files. While these destinations can be handy, the majority of extracts that I use are to staging tables in a relational engine. This post looks at the Biml required to send our data to ODBC destinations.

The Environment

For the purpose of demonstration, I will use the DimCustomer table from adventure works. There’s nothing too complicated about that table, all I want to do is extract some data from it so we’ll just use a simple query (with code, first name and last name);

select 
CustomerAlternateKey
, FirstName
, LastName 
from dbo.DimCustomer;

For the destination, we’ll look at two options. Firstly we will rely on an auto mapping feature (so that we do not specify column mapping between the source and destination). Secondly, we will override that feature and specify column to column mapping. For this I’ll create two tables in a staging database called customer_automapping (with the same field names as the source) and customer_manualmapping (with different names). The SQL for these tables is given below;

create table dbo.customer_automapping
(
	CustomerAlternateKey nvarchar(25)
	, FirstName nvarchar(50)
	, LastName nvarchar(50)
);

create table dbo.customer_manual
(
	customer_cd nvarchar(25)
	, first_name nvarchar(50)
	, last_name nvarchar(50)
);

Proforma Template

We’ll use Biml to create two parallel dataflows in a package (the package will be called copy_customer) and the data flows will be called customer_automapping and customer_manualmapping. Our template package looks like the one below;

<Biml xmlns="http://schemas.varigence.com/biml.xsd">
  <Connections>
    <OdbcConnection Name="dest_stage" ConnectionString="Driver={SQL Server Native Client 11.0};...." />
    <OdbcConnection Name="src_adventure_works" ConnectionString="Driver={SQL Server Native Client 11.0};..." />
  </Connections>
  <Packages>
    <Package Name="copy_customer" ConstraintMode="Parallel">
      <Tasks>
        <Dataflow Name="customer_manualmapping">
			<Transformations>
			</Transformations>
        </Dataflow>
        <Dataflow Name="customer_automapping">
			<Transformations>
			</Transformations>
        </Dataflow>
      </Tasks>
    </Package>
  </Packages>
</Biml>

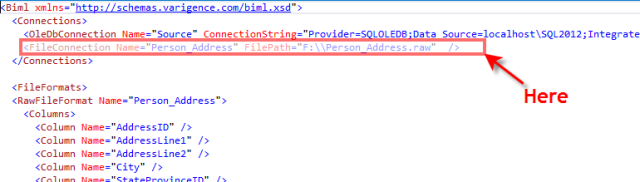
Note we have already define placeholders for each dataflow, all we have to do is populate those (transformation) nodes. We also define our source and destination connections.

The ODBC Source

We have previously addressed an ODBC source so for simplicity will just add the code. This needs to be added to each dataflow transformation node;

<OdbcSource Name="src_adventure_works" Connection="src_adventure_works">
  <DirectInput>
	select CustomerAlternateKey, FirstName, LastName from dbo.DimCustomer;
  </DirectInput>
</OdbcSource>

The ODBC Destination

We’d expect the ODBC destination to require a name (since every item requires one), connection and a table (name). These are the only requirements for an automapping feature (where the source fields are automatically mapped to the destination fields on the basis of name). The snippet for the automapping dataflow is therefore;

<Dataflow Name="customer_automapping">
  <Transformations>
	<OdbcSource Name="src_adventure_works" Connection="src_adventure_works">
	  <DirectInput>
		select CustomerAlternateKey, FirstName, LastName from dbo.DimCustomer;
	  </DirectInput>
	</OdbcSource>
	<OdbcDestination Name="dest_customer" Connection="dest_stage" >
	  <ExternalTableOutput Table="[dbo].[customer_automapping]" />
	</OdbcDestination>
  </Transformations>
</Dataflow>

Note that the table is defined by the ExternalTableOutput tag. There is no need to fully qualify the table as I have done (by inclusion of the schema) and <ExternalTableOutput
Table=customer_automapping />

would suffice provided the default schema for the connection was the same as the table. As expected, our dataflow creates the source and destination components and automatically maps fields from the source to the destination based on name.

To explicitly set the source to target mappings, we need to include a columns (and column(s)) tag as a child node of the destination. The Biml for this is below but it is worth identifying that mapping will only be overwritten if it exists in this tag. For example, if two columns have the same name and there is no mapping column specification, the two fields will be auto matched. Therefore, to fully specify the mapping in the ODBC destination we would use the following snippet;

<OdbcDestination Name="dest_customer" Connection="dest_stage" >
  <ExternalTableOutput Table="[dbo].[customer]" />
  <Columns>
	<Column SourceColumn="CustomerAlternateKey" TargetColumn="customer_cd"  />
	<Column SourceColumn="FirstName" TargetColumn="first_name"  />
	<Column SourceColumn="LastName" TargetColumn="last_name"  />
  </Columns>
</OdbcDestination>

It’s clear to see that the mapping occurs between the SourceColumn and TargetColumn attributes of each column node.

The Complete Biml File

For completeness, we’ll add the complete Biml Code;

<Biml xmlns="http://schemas.varigence.com/biml.xsd">
  <Connections>
    <OdbcConnection Name="dest_stage" ConnectionString="Driver={SQL Server Native Client 11.0};…." />
    <OdbcConnection Name="src_adventure_works" ConnectionString="Driver={SQL Server Native Client 11.0};…;" />
  </Connections>
  <Packages>
    <Package Name="copy_customer" ConstraintMode="Parallel">
      <Tasks>
        <Dataflow Name="customer_manualmapping">
          <Transformations>
            <OdbcSource Name="src_adventure_works" Connection="src_adventure_works">
              <DirectInput>
                select CustomerAlternateKey, FirstName, LastName from dbo.DimCustomer;
              </DirectInput>
            </OdbcSource>
            <OdbcDestination Name="dest_customer" Connection="dest_stage" >
              <ExternalTableOutput Table="[dbo].[customer]" />
              <Columns>
                <Column SourceColumn="CustomerAlternateKey" TargetColumn="customer_cd"  />
                <Column SourceColumn="FirstName" TargetColumn="first_name"  />
                <Column SourceColumn="LastName"   />
              </Columns>
            </OdbcDestination>
          </Transformations>
        </Dataflow>
        <Dataflow Name="customer_automapping">
          <Transformations>
            <OdbcSource Name="src_adventure_works" Connection="src_adventure_works">
              <DirectInput>
                select CustomerAlternateKey, FirstName, LastName from dbo.DimCustomer;
              </DirectInput>
            </OdbcSource>
            <OdbcDestination Name="dest_customer" Connection="dest_stage" >
              <ExternalTableOutput Table="[dbo].[customer_automapping]" />
            </OdbcDestination>
          </Transformations>
        </Dataflow>
      </Tasks>
    </Package>
  </Packages>
</Biml>

Overwriting the Automap

There may be a situation where you want to Automap some fields but not others (say for example we did not want to populate the CustomerAlternateKey field). In this situation we can rely on auto-mapping and specify the column as not being used through the IsUsed attribute. For example, we could use;

<OdbcDestination Name="dest_customer" Connection="dest_stage" >
  <ExternalTableOutput Table="[dbo].[customer_automapping]" />
  <Columns>
	<Column SourceColumn="CustomerAlternateKey"  IsUsed="false" />
  </Columns>
</OdbcDestination>


BIML VI – Using Include to Separate BIML Components into Files

In a previous post, we looked at using the XML clause in SQL Server to generate Biml’s XML. The basis of that post was that our package had a pro forma template and we could just substitute code into placeholders. For example, the foundation snippet (below) could just be used and we could replace the … my Type snippet … components with automatically generated code (which was of course derived by the for XML clause in SQL Server).

<Biml xmlns="http://schemas.varigence.com/biml.xsd">
  <Connections>
    <OleDbConnection Name="Source" ConnectionString="Provider=SQLOLEDB;Data Source=localhost\SQL2012;Integrated Security=SSPI;Initial Catalog=AdventureWorksDW2012" />
    … my raw file connection snippet …
  </Connections>
    
  <FileFormats>
    ... my format snippet ...
  </FileFormats>
  
  <Packages>
    <Package Name="02_Copy_Table_To Raw_File" ConstraintMode="Parallel" ProtectionLevel="DontSaveSensitive" >
      <Tasks>
	  ... my task snippet ...
	  </Tasks>
    </Package>
  </Packages>
</Biml>

In that example I pasted the code directly into the placeholder. Notwithstanding the generation of XML (other systems may not include the XML clause or we may wish to refine the query to generate the code), placing the full XML into the snippet placeholders creates a rather large file. This may make it unfriendly and hard to work with and confusing to someone expected to pick up the code.

One method around this is to use the Biml include directive is separate the Biml code into component files. In order to do this we simply place the snippet into a file (the files extension is irrelevant) and then call that file in the Biml code.

For example, if we had a file (F:\temp\biml\connections.txt) that defines our connections, we could simply include the following code into our Biml script.

<#@ include file="F:\temp\biml\connections.txt" #>

Of course, the connections.txt file contains the XML that we would expect to be placed in the … snippet… section. When the Biml is run, the contents of the file are read and are placed where the directive is.


BIML V – Precedence Constraints

In prior posts, precedence constraints have been managed through the package setting for ConstraintMode. This assumes either a parallel execution (ie ConstraintMode=Parallel) or sequential execution (ie ConstraintMode=Linear). The ConstraintMode is a mandatory property for the package and considers the order by which tasks are defined in code.

To illustrate this we’ll add three SQL tasks and observe the generated package when the constraint mode is set.

Linear Constraint

A Linear constraint creates a precedence constraint between tasks in the order in which those tasks are added in script (as below)

<Package Name=”Precidence_Constraints” ConstraintMode=”Linear”>
  <Tasks>
	<ExecuteSQL Name=”Select 1” ConnectionName=”DB_Src”>
	  <DirectInput>Select 1</DirectInput>
	</ExecuteSQL>
	<ExecuteSQL Name=”Select 2” ConnectionName=”DB_Src”>
	  <DirectInput>Select 2</DirectInput>
	</ExecuteSQL>
	<ExecuteSQL Name=”Select 3” ConnectionName=”DB_Src”>
	  <DirectInput>Select 3</DirectInput>
	</ExecuteSQL>
  </Tasks>
</Package>


Parallel Constraint


A parallel constraint simply adds the tasks to the control flow (as below). Note that since all tasks are defined in parallel, there is no execution order (as defined by a constraint).


<Package Name="Precidence_Constraints" ConstraintMode="Parallel">
  <Tasks>
	<ExecuteSQL Name="Select 1" ConnectionName="DB_Src">
	  <DirectInput>Select 1</DirectInput>
	</ExecuteSQL>
	<ExecuteSQL Name="Select 2" ConnectionName="DB_Src">
	  <DirectInput>Select 2</DirectInput>
	</ExecuteSQL>
	<ExecuteSQL Name="Select 3" ConnectionName="DB_Src">
	  <DirectInput>Select 3</DirectInput>
	</ExecuteSQL>
  </Tasks>
</Package>


Naturally, we may want more control over the order in which tasks are executed and we can do this by overwriting a tasks default constraints (which is set in the package). That is, overwriting the ConstraintMode that we set. For example assume that we want to fire [Select 1] and then [Select 2] in parallel with [Select 3] as in the following image.


In order to do this, we need to set the precedence constraint for [Select 3] (of course I’m assuming that we have a linear constraint mode to create the constraint between [Select 1] and [Select 2]). This is a property of the task and set on the incoming task. For example, [Select 3] is defined by the following snippet.

<ExecuteSQL Name="Select 3" ConnectionName="DB_Src">
  <DirectInput>Select 3</DirectInput>
  <PrecedenceConstraints>
	<Inputs>
	  <Input OutputPathName="Select 1.Output" />
	</Inputs>
  </PrecedenceConstraints>
</ExecuteSQL>


Note that the precedence constraint is a node of the task and the input of the constraint (the task to be executed prior to this one) is defined by name and suffixed with “.Output” (ie OutputPathName=”Select 1.Output”).


Yes We Overwrite the Constraint


It is important to remember that we are overwriting the default constraint for the package. While this may not be an issue with parallel execution (since we need to define each constraint manually), it may be an issue for linear constraints.


For example, suppose that we add [Select 4] to the package and we want to have this fire in parallel with [Select 1] and beta constraint for [Select 3] (as below).


We may assume that we can just append [Select 4] as the final task in the package and specify the precedence constraints for [Select 3] as [Select 1] and [Select 2]. The pseudo xml (yes I made that up), is


<ExecuteSQL Name="Select 1" />
<ExecuteSQL Name="Select 2" />
<ExecuteSQL Name="Select 3" >
  <PrecedenceConstraints Inputs>
	  <Input OutputPathName="Select 1.Output" />
	  <Input OutputPathName="Select 4.Output" />
  </PrecedenceConstraints>
</ExecuteSQL>
<ExecuteSQL Name="Select 4" />


Unfortunately, the linear mode for the package is enforced whenever the precedence constraint is not set for a task. The above snippet would produce the following package.


Notice that the precedence constraint between [Select 3] and [Select 4] is dependent on its own execution? That is [Select 3] can only executed after [Select 4] and [Select 4] is dependent on [Select 3].


Clearly this is not the outcome that we anticipated (and in my testing it crashes visual studio).


If we wish to overwrite the packages default constraint (it was linear), we must explicitly set the input constraint to be nothing. This can be done with the following snippet;


<ExecuteSQL Name="Select 4" ConnectionName="DB_Src">
	<DirectInput>Select 4</DirectInput>
	<PrecedenceConstraints>
	  <Inputs />
	</PrecedenceConstraints>
</ExecuteSQL>  


We can define tasks in any order, but we need to be aware that a linear constraint will assume a sequential execution order.

Other Properties of the Constraint

Perhaps the most important property (when dealing with multiple input constraints) are logical conditions. That is, whether all or only one inputs need to be completed successfully or not (that is the prior task(s) complete with success or failure.


We can set the logical conditions through the tasks <PrecedenceConstraints> tag by using the property LogicalType. This property has two allowable values (And, Or) and specifies that all input constraints must execute prior to this task (if And is specified) or only one prior task must complete before this one (if Or is specified). We can see the outcome of the Or Condition below. Of course there is no need to specify this explicitly, by default AND is used.


<ExecuteSQL Name="Select 3" ConnectionName="DB_Src">
  <DirectInput>Select 3</DirectInput>
  <PrecedenceConstraints LogicalType="Or">
	<Inputs>
	  <Input OutputPathName="Select 1.Output"  />
	  <Input OutputPathName="Select 4.Output" />
	</Inputs>
  </PrecedenceConstraints>
</ExecuteSQL>


Finally, we may want to specify a failure condition, for example, [Select 3] would only be fired if [Select 4] fails and [Select 1] is successful. This type of control is usually used for error handling. We can do this by specifying the property ExecutionValue property for the constraint. Note that this snippet assumes And (default) logic for constrains


<ExecuteSQL Name="Select 3" ConnectionName="DB_Src">
  <DirectInput>Select 3</DirectInput>
  <PrecedenceConstraints>
	<Inputs>
	  <Input OutputPathName="Select 1.Output"   />
	  <Input OutputPathName="Select 4.Output" EvaluationValue="Failure"/>
	</Inputs>
  </PrecedenceConstraints>
</ExecuteSQL>


Conclusion


There is a high degree of control for managing the execution order of tasks. These can be initially handled with minimum effort by utilising default values for package properties (that is the packages ConstraintMode). Additionally this to full behaviour can be overwritten by explicitly specifying the constraints for each task.


BIML IV– Extracting All Tables to Raw Files

Perhaps the first task of any (DW/ DM) project is to extract data – after all it’s the E in the ETL isn’t it? I know there’s a lot more that goes on here but it’s the most boring job I can think of doing and one which inevitably has to be done. In a previous Post (Biml III), I looked at using BIML to extract a table to a Raw File. This post will extend that so that we can automatically generate the code required to do the task – that is, we want to have a source database and automatically create a package to extract all the tables from the database.

To be honest, the Biml framework was put in place in the prior post. What I like about what we are going to do here is the quick generation of a package to achieve this. We will look into some Xml SQL also and, while you could argue that the process is a bit of a hack, it gets a result very fast. Also, we could extend this practice to other database platforms, all we want to do is generate Biml Code. So let’s begin.

Overview

I’ve already stated our objective is to generate Biml so that we can create a package which will extract all tables from our database. In order to do this, we are going to create the Xml specification through a set of queries that populate the proforma for a single table extract. Here’s the proforma;

<Biml xmlns="http://schemas.varigence.com/biml.xsd">
  <Connections>
    <OleDbConnection Name="Source" ConnectionString="Provider=SQLOLEDB;Data Source=localhost\SQL2012;Integrated Security=SSPI;Initial Catalog=AdventureWorksDW2012" />
    <FileConnection Name="Target" FilePath="F:\\Output.raw"  />
  </Connections>
   
  <FileFormats>
    <RawFileFormat Name="Output" >
      <Columns>
	…. (column list)
      </Columns>
    </RawFileFormat>
  </FileFormats>
 
  <Packages>
    <Package Name="02_Copy_Table_To Raw_File" ConstraintMode="Parallel" ProtectionLevel="DontSaveSensitive" >
      <Tasks>
        <Dataflow Name="Copy_Dim_Account">
          <Transformations>
            <OleDbSource Name="Src_Dim_Account" ConnectionName="Source" >
              <DirectInput>Select AccountKey, AccountCodeAlternateKey, AccountDescription, AccountType, Operator from DimAccount;</DirectInput>
            </OleDbSource>
            <RawFileDestination Name="Dest_Dim_Account" RawFileFormatName="Output"  WriteOption="CreateAlways" >
              <FileOutput ConnectionName ="Target" />
            </RawFileDestination>
          </Transformations>
        </Dataflow>
      </Tasks>
    </Package>
  </Packages>
</Biml>


There are 3 major things we’ll need to define. There are;

  1. The output file connection which is held in the Connections node. Let’s assume that is name should include the schema and table_name. For example, the extract for Person.Address should output a file called Person_Address.
  2. The file format for a raw file which is simply the list of columns that we want to export (held in the FileFormats node). There is a parent node of the column list which is defined by name and, (in our work), we should specify this by the schema and table.
  3. The data flow transform with an Oledb source and raw file destination (mapping will be managed by name matching). The target uses the file connection (defined in step 1) and the file format (step 2) which is defined by schema and table_name. Since we want to give our data flow components a meaningful name we’ll also prefix them with src (for source) and dest (for destination).

Now, lets look at how we can generate XML for each of our 3 components.

Target Files

The generation of target files is pretty straight forward. All we need is a query that produces a file connection node with the (file output). One for each table in the database. The query below does this and produces the output. There’s nothing too complicate here, but I’ve you never heard of the information schema on SQL Server, you may want to read a little more about the views here. Basically, they define the database (and what we are interested in is tables and columns).

The query,

/*	PTB, 10-Nov-2014
	SQL to Generate Biml FileConnections (all tables in a DB)
 */

declare @output_directory nvarchar(50) = 'F:\\DB_DUMP'

select 
'<FileConnection Name="' 
	+ TABLE_SCHEMA + '_' 
	+ TABLE_NAME + '" FilePath="' 
	+ @output_directory + '\\' 
	+ TABLE_SCHEMA + '_' + TABLE_NAME + '.raw" />'
from INFORMATION_SCHEMA.TABLES 
where TABLE_TYPE = 'BASE TABLE'

Produces the folowing output.


All we want to do is take the output from the query and post it where our connections node.


File Formats

All the file format needs to do is specify a list of columns under a RawFileFormat Node. Of course the format must have a name but in essence we need to produce some xml that looks like the following snippet. And, it needs to be done for every table that we are going to extract.

    <RawFileFormat Name="Person_Address">
      <Columns>
        <Column Name="AddressID" />
        <Column Name="AddressLine1" />
        <Column Name="AddressLine2" />
        <Column Name="City" />
        <Column Name="StateProvinceID" />
        <Column Name="PostalCode" />
        <Column Name="rowguid" />
        <Column Name="ModifiedDate" />
      </Columns>

We are also a little restricted by the capabilities of the raw file output. This destination does not accept certain data types (eg Geography, XML or images) and so these need to be excluded from the definition. If they are not, our package will try and map source columns to these fields and the transform will fail (actually, it won’t validate). This is not an issue with Biml, rather a limitation of the destination.

Again, if you’ve not used the INFORMATION_SCHEMA before, you may want to have a quick look at the INFORMATION_SCHEMA.COLUMNS view. This view lists all the columns (and tables of the database). Since I want xml returned, I can use the XML clause to have the query generate an XML node for me (rather than a standard row set). There is a lot in the XML clause (if you want more information, you can read it here). My query;

/*	PTB, 10-Nov-2014
	SQL to Generate Biml FileFormats for all tables in a DB
 */

select 

  TABLE_SCHEMA + '_' + TABLE_NAME "@Name"
,  (select COLUMN_NAME "@Name" 
	from INFORMATION_SCHEMA.COLUMNS 
	where TABLE_NAME = t.TABLE_NAME and TABLE_SCHEMA=t.TABLE_SCHEMA
		and  
		( 
			DATA_TYPE <> 'geography'
			and not ( DATA_TYPE='nvarchar' and CHARACTER_MAXIMUM_LENGTH = -1 ) 
			and not ( DATA_TYPE='varbinary' and CHARACTER_MAXIMUM_LENGTH = -1 ) 
			and DATA_TYPE <> 'Xml'
		)
	for xml path('Column'), type, root('Columns')
	)
from INFORMATION_SCHEMA.TABLES t 
WHERE TABLE_NAME in
					(
						SELECT TABLE_NAME 
						from INFORMATION_SCHEMA.TABLES 
						where TABLE_TYPE = 'BASE TABLE'
					)

for XML PATH('RawFileFormat'), type , ROOT('FileFormats')  

Returns an xml node which is shown in the results view like this.


Now, when we click the xml (note that it looks like a url), a new output window opens up with the following code. This is exactly what we need for the file formats and we can past over the proforma FileFormats node.

The Xml output from the File Formats query


Data Flows

Since we want to include all our data flows in a single package (with one dataflow for each table), we need to generate the xml for the data flow in a packages node. We know that the package has a tasks child which specifies the control flow and each data flow should reside within it. For example, a single data flow would look like this.

      <Tasks>
 
        <Dataflow Name="EXTRACT_Person_Address">
    
          <Transformations>
          <OleDbSource Name="src_Person_Address" ConnectionName="Source">
            <DirectInput>Select * from Person.Address</DirectInput>
          </OleDbSource>
          <RawFileDestination Name="dest_Person_Address" RawFileFormatName="Person_Address" WriteOption="CreateAlways">
            <FileOutput ConnectionName="Person_Address" />
          </RawFileDestination>
        </Transformations>
       
        </Dataflow>
     
      </Tasks>

Now, we need a query to generate xml for all tables…. (and here is it). It gives us the full tasks node for our package.

/*	PTB, 10-Nov-2014
	SQL to Generate Dataflow's for Biml output (all tables in a DB)
 */

select 

'EXTRACT_' + TABLE_SCHEMA + '_' + TABLE_NAME as "@Name"
, 'src_' + TABLE_SCHEMA + '_' + TABLE_NAME as "Transformations/OleDbSource/@Name"
, 'Source' as "Transformations/OleDbSource/@ConnectionName"
, 'Select * from ' + TABLE_SCHEMA + '.' + TABLE_NAME  as "Transformations/OleDbSource/DirectInput"
, 'dest_' + TABLE_SCHEMA + '_' + TABLE_NAME as "Transformations/RawFileDestination/@Name"
, TABLE_SCHEMA + '_' + TABLE_NAME as "Transformations/RawFileDestination/@RawFileFormatName"
, 'CreateAlways' as "Transformations/RawFileDestination/@WriteOption"
, TABLE_SCHEMA + '_' + TABLE_NAME as "Transformations/RawFileDestination/FileOutput/@ConnectionName"

from INFORMATION_SCHEMA.TABLES 
where TABLE_TYPE = 'BASE TABLE' 
order by TABLE_SCHEMA, TABLE_NAME
for XML path('Dataflow'), root('Tasks')

Putting it All Together

Because the xml generated is so big, I will not include the full output. However, I think its good to have an indication of what the output should look like. So a subset of the output will look like this.

Conclusion

When we build the Biml, we will get a single ssis package with a data flow for each table (as shown below) with all the effort of generating the transforms handled by Biml. I’d like to go into the xml clause for SQL a little further but I think it would complicate what we are trying to achieve (after all this post is pretty long as it is).

Now … I have to ask … Is this the most elegant solution and could it be done better?


Perhaps not but I think it’s a pretty cheeky (and extremely fast) way to generate a package to do an awful lot of copying.


BIML III – Extracting Database Tables to Raw Files

In a previous post, we looked at extracting a table to a flat file. Personally, I am not a huge fan of flat file output because you lose so much metadata when a table with all its data types are dumped into text. To preserve this information, I would much rather use a raw file output. This post looks at the Biml requirements to output to a raw file.

Overview

If you haven’t read the post about output to test files, it may be worth a quick read. Basically we discuss the process that we use to extract a table as the following list of activities.

  1. Create a connection to SQL Server
  2. Add a dataflow task
  3. Specify a source (let’s just use an OLEDB source) and provide the query.
  4. Add a flat file as a destination output then join the source to destination and then configure the output by creating a new flat file connection manager.

Of course, we could replace flat file here with raw file and we would pretty much have the same method. That’s exactly what is required – the only real difference is that the raw file format does not require delimiter specifications. Our proforma template remains the same;

<Biml xmlns="http://schemas.varigence.com/biml.xsd">
  <Connections>
    <!-- Placeholder for connection -->
  </Connections>
  <FileFormats>
    <!-- Placeholder for structures-->
  </FileFormats>
  <Packages>
    <Package Name="CopyAccount" ConstraintMode="Linear">
    <!-- Place Holder for a Package -->
    </Package>
  </Packages>
</Biml>

Connections

Our database connection remains the same. The output (raw file) is specified as a file connection.

<Connections>
  <OleDbConnection Name="Source" ConnectionString="Provider=SQLOLEDB;Data Source=localhost;Integrated Security=SSPI;Initial Catalog=AdventureWorksDW2012" />  
  <FileConnection Name="Target" FilePath="F:\\Output.raw"  />
</Connections>


FileFormat

The file format (remembering that it’s a child of the FileFormats and defines a table structure) only needs to specify the format name and column output.

  
  <FileFormats>
    <RawFileFormat Name="Output" >
      <Columns>
        <Column Name="AccountKey"   />
        <Column Name="AccountCodeAlternateKey"   />
        <Column Name="AccountDescription"   />
        <Column Name="AccountType"    />
        <Column Name="Operator"   />
      </Columns>
    </RawFileFormat>
  </FileFormats> 


As with text formats, the order is not important, only the Name. We will utilise auto mapping between the source and target.

The Package/ Data Flow

For the text file extract, our package contained a dataflow which simply had a source and destination. The source specified an SQL statement and the destination specified the type (FlatFile) which had an embedded file format. This is an important point… the flat file destination requires a file connection and the connection requires a format.

This is not the same for the raw file output. Here the raw file destination requires both a connection and the file format. If we have a quick look at the dataflow snippet, you’ll see what I mean.

<Dataflow Name="Copy_Dim_Account">
  <Transformations>
	<OleDbSource Name="Src_Dim_Account" ConnectionName="Source" >
	  <DirectInput>Select AccountKey, AccountCodeAlternateKey, AccountDescription, AccountType, Operator from DimAccount;</DirectInput>
	</OleDbSource>
	<RawFileDestination Name="Dest_Dim_Account" RawFileFormatName="Output"  WriteOption="CreateAlways" >
	  <FileOutput ConnectionName ="Target" />
	</RawFileDestination>
  </Transformations>
</Dataflow> 

Now compare this to the flat file and notice that the file format is not required (for text).

<Dataflow Name="Copy_Dim_Account">
  <Transformations>
	<OleDbSource Name="Src_Dim_Account" ConnectionName="Source" >
	  <DirectInput>Select AccountKey, AccountCodeAlternateKey, AccountDescription, AccountType, Operator from DimAccount;</DirectInput>
	</OleDbSource>
	<FlatFileDestination Name="Dest_Dim_Account" ConnectionName="Target" Overwrite="true">
	</FlatFileDestination>
  </Transformations>
</Dataflow> 


Complete Code

For completeness, the full code to extract an table (or more precisely a SQL query) to a raw file is;

<Biml xmlns="http://schemas.varigence.com/biml.xsd">
  <Connections>
    <OleDbConnection Name="Source" ConnectionString="Provider=SQLOLEDB;Data Source=localhost\SQL2012;Integrated Security=SSPI;Initial Catalog=AdventureWorksDW2012" />
    <FileConnection Name="Target" FilePath="F:\\Output.raw"  />
  </Connections>
  
  <FileFormats>
    <RawFileFormat Name="Output" >
      <Columns>
        <Column Name="AccountKey"   />
        <Column Name="AccountCodeAlternateKey"   />
        <Column Name="AccountDescription"   />
        <Column Name="AccountType"    />
        <Column Name="Operator"   />
      </Columns>
    </RawFileFormat>
  </FileFormats>

  <Packages>
    <Package Name="02_Copy_Table_To Raw_File" ConstraintMode="Parallel" ProtectionLevel="DontSaveSensitive" >
      <Tasks>
        <Dataflow Name="Copy_Dim_Account">
          <Transformations>
            <OleDbSource Name="Src_Dim_Account" ConnectionName="Source" >
              <DirectInput>Select AccountKey, AccountCodeAlternateKey, AccountDescription, AccountType, Operator from DimAccount;</DirectInput>
            </OleDbSource>
            <RawFileDestination Name="Dest_Dim_Account" RawFileFormatName="Output"  WriteOption="CreateAlways" >
              <FileOutput ConnectionName ="Target" />
            </RawFileDestination>
          </Transformations>
        </Dataflow>
      </Tasks>
    </Package>
  </Packages>
</Biml>


Conclusion

There is not a great deal of variation here between a flat file output and a text file so you may ask why include it? In a future post well look at a simple solution to output an entire database to raw files. Our goal in that post is to mimic the staging steps of data warehouse creation. However, in order to do that, we need the basics of file output.